Saturday, February 8, 2014

Homemade Cheese Crackers

My sister needed a babysitter for tonight so I thought it would be the perfect time to make these homemade crackers, because who can resist 2 kids who love to help out in the kitchen?

For both of them being under the age of 10, it was a fairly easy (and entertaining for them) experience and they got to help with practically everything.


Little hands using mini cutters make this part a breeze, just sit back and help when needed 
(when the dough got stuck in the cutter)


The ingredients are simple and basic:

8 oz package of shredded cheddar cheese
1 cup flour
1/2 teaspoon salt
2 Tablespoons water and a half stick of unsalted butter (4 Tablespoons)

Dump all the ingredients into the food processor and pulse until it's all mixed and looks like sand then add the water and pulse some more until it's all mixed in.  Pop in into a plastic bag and toss it in the fridge for about a half an hour, or a little less if the little ones are getting a bit impatient to start cutting.

Preheat the oven to 350F.

Roll out the dough until it's nice and thin and use mini cookie cutters to make fun shapes or just use a pizza cutter to make squares.

Place the pieces onto a lined baking sheet and pop them into the oven for about 10 min or until they start to get a nice golden brown color.

Fun shapes ready to go to the oven
Fresh from the oven, some were thicker than others but still yummy


The kids really liked the end result and my mother and sister both said that they were better than goldfish and cheese-its. The big kid in my household, aka John, likes them as well. By slowly having him try these homemade versions of his favorite snack foods I'm getting him to eat more healthy alternatives to processed store-bought foods. Plan on making another batch soon and giving him some that are all made using the heart cutter for Valentine's Day.

Hope you enjoy these as much as we are,

Jessa

Tuesday, February 4, 2014

Seared mahi mahi with spinach ravioli and fresh broccoli

I had planned on making a family favorite for dinner tonight but while we were out John spotted some fresh fish. Once I spotted what fish he was looking at I decided to throw my original plans out the window. I'm not a huge fan of most fish but absolutely LOVE mahi mahi. It had a wonderful natural flavor that's not overpowering. Once I realized how he was planning on cooking it (throwing it in the oven in some tin foil and lots of spices and veggies) I promptly took over. 

I heated up a large frying pan with a little bit of olive oil and let it get nice and hot before throwing both huge fillets in. Once seared on the one side I flipped it over to sear the other side. Turned the heat down to medium-low and let it cook all the way through. I sprinkled a pinch of kosher salt over each and some fresh ground pepper and let it simmer away while I cooked the rest of the food. 

The oven got preheated to 350F and went to cut up some of my homemade bread for the garlic bread. Just spread a little butter on the bread, generously sprinkle garlic power over the top, place on a parchment paper lined baking sheet and 10-15 min later it's done and delicious. 

I found some wonderful organic spinach and cheese ravioli that I cooked up to go along with our dinner and because I was in a veggie mood I steamed some fresh broccoli as well. 

John wanted some sautéed peppers and onions to go with his fish so while everything else was cooking I pulled out a second frying pan, added a little bit of olive oil and sautéed the peppers and onions he had chopped for me. 

I made up his plate and one for me that had the peppers and onions on the side and tucked in to my yummy meal. Before John could try a bit with all the peppers and onions I gave him a bite of my plain fish and sat back and enjoyed as his eyes went wide and he exclaimed "Wow, that tastes really good!!" He also enjoyed the fish with the added veggies as well. 

I have a feeling that sometime soon he will be surprising me with more Mahi Mahi to make for him for dinner. 

He laughs at the fact that I'd look at him strange if he ever brought me flowers but get happy over cooking and baking ingredients and cookware and accessories. It's part of what makes me who I am and neither of us would change that one bit. 

As always I look forward to hearing what you have to say. 

Until next time,
Jessa

Monday, February 3, 2014

Southern style Breakfast- Biscuits and gravy

John loves biscuits and gravy, so this morning I decided to spoil him a bit and make him his favorite breakfast.  It was fairly quick and easy and hearing that it was the best biscuits and gravy he's ever eaten basically guarantees that I'll make it for him again.
Homemade Buttermilk biscuits and Sausage Gravy with dippy eggs

The first thing I did was take the sausage and throw it into my large cast iron skillet and let that cook up on med heat while I prepared the biscuits.

Buttermilk biscuits:

Preheat the oven to 425F.

In large mixing bowl, add 2 cups of flour, 3 teaspoons of baking soda, and 1/2 teaspoon salt and whisk together.  Because I was using powered buttermilk (it was all I had on hand at the moment) I put 4 Tablespoons of the powered buttermilk in the flour mixture at this point and whisked it together.

Next you add 1 T of cold butter and 3 T of shortening (I use the Crisco sticks for easy measuring) and cut it into the flour mixture.

Gently mix 1 cup of water in and stir until mixed, be sure to gently mix it or the biscuits can end up hard and tough.

Put the mix on a floured surface and gently pat it down until it's about an inch thick, then using a sharp cutter (or if you forgot where you put them like I did, use a sharp knife) and cut the biscuits without twisting the cutter.

Transfer to well greased baking sheet and pop it into the oven for 10 min.


They came out a nice golden color while being soft and moist in the middle.


While the biscuits were in the oven I once again turned my attention back to the gravy.
The sausage was all nice and cooked (I would pause in the biscuit making to quickly turn the sausage so it would cook all the way through and not burn) so I cut it up into crumbles and then using a slotted spoon removed the crumbles from the pan.  If you have a lot of grease in the pan drain it until you have aprox 1 Tablespoon left then mix in 1/4 cup flour and using a whisk combine the two into a fairly smooth paste.  Next step is adding 2 cups of milk and cooking the gravy over med heat, whisking it constantly so it doesn't burn or clump.  After a minute I added an additional Tablespoon of flour and continued to whisk so it was combined with no clumps.  This step takes about 5 minutes or so and you keep whisking it until it starts to thicken up.  When it gets thick, turn off the heat add a pinch of salt and about 1/4-1/2 teaspoon of fresh-ground pepper, I use a lot because John loves pepper in his food. Add the sausage crumbles and the gravy is ready for the biscuits that should be done now.

John's new favourite sausage gravy


Crumble the biscuits on a plate and pour the gravy over it and breakfast is ready!


I made enough biscuits that there are enough left over to make a yummy desert with them tonight, if they last that long.

Hope you enjoy this as much as John did

Jessa

Tuesday, January 28, 2014

Homemade spaghetti sauce and meatballs

It's been a while since my last post mostly because I've discovered that it's hard to post recipes for things when I don't actually use one when I cook.  Most of my cooking involves adding things a pinch or dash at a time, or pouring things in until they look how I think it should.  Which is great when I'm making things for myself but not when people want to know how I did it. My mother and sister (and quite a few other people throughout the years) have threatened to set up cameras all over my kitchen so they can have a record of what I'm throwing in the pot (or mixer) so they can try to make it again.  On of the many things I make like that is my spaghetti sauce. This time I made sure to measure out the ingredients, well. . . it was more along the lines of pouring the amount of spices into my hand then transferring them to a measuring spoon, then throwing in into the pot.  And I wrote it down on a piece of paper before going on to the next spice.  If any of my friends or relatives were in the kitchen with me, I'm positive that they would have started recording it with their phone after calming down from laughing first.
Spaghetti Sauce after it's been simmering for a while

Here's the recipe that I came up with for today's sauce. Because of the way I cook it usually doesn't end up the same way twice but Johnny loves it.

1 28 oz can of Diced tomatoes
1 28 oz can of Crushed tomatoes (I used the Dole ones for both of these because they don't have any preservatives in them, at least until I get around to canning my own)
4 Roma tomatoes, sliced
I green pepper, chopped
1 onion, chopped
1 head of garlic, smashed
1 teaspoon basil
1 teaspoon crushed red peppers
1 teaspoon parsley
1 teaspoon oregano
1/2 teaspoon rosemary
1/2 teaspoon ground sage
1/2 teaspoon ground pepper
1/8 teaspoon kosher salt (or just use a small pinch, mine measured out to be 1/8t)
2 bay leaves

1 lb ground turkey (optional)  You can also use ground beef, sausage or a combination of those

Toss all the veggies in a large saucepot, add the spices and give it a good stir to combine it all. Let simmer while you fry up the meat, sirring occasionally.  Add the cooked meat to the mixture and let simmer until it's nice and hot.

While the sauce is simmering away I made the meatballs.
Turkey meatballs ready to eat


Turkey meatballs

1 lb ground turkey
1 egg
8 oz cooked spinach
1 teaspoon crushed red peppers
1 teaspoon garlic powder
1 teaspoon parsley flakes
1 cup breadcrumbs


Pre-heat the oven to 350F.

Add all the ingredients to a large mixing bowl and use your hands to mix it until all the ingredients are mixed together.

I like the larger meatballs so mine ended up being a little bit larger than a golf ball, similar in size to a racquetball.  I grabbed a hunk of the mixture, rolled it into a ball with my hands and dropped it into a muffin tin. I ended up with 12 meatballs, which worked out perfectly.  Popped them into the oven for approx 25 minutes (I started checking on them after 20 min and they were done when they reached a temp of 180 on my meat thermometer)


The meatballs ready to go into the oven
Fresh out of the oven

While those were baking and my sauce was simmering, I put the water on to boil for the noodles and sliced some bread for the garlic bread. Smear some butter on the bread and pour garlic powder over them to your taste (I love garlic so I use a lot on mine) and place on a baking sheet.  They only take approx 5 min in the oven at 350, so I put them in right after I pull out the meatballs and am about to drain the noodles.


A closeup of the sauce with the noodles and meatballs

Dinner's ready!!


I wouldn't recommend serving as much on the plate as I did if you have a rule in the house about cleaning your plate, it's very filling. Neither John or I managed to clean our plates so they got packed up into containers for tomorrow's lunch, plus another container that was just filled with the leftover sauce. That one went into the freezer for a day where I just don't feel like cooking, lol.

Hope you enjoy it as much as we did,

Jessa

Thursday, January 16, 2014

It's a cheesy cheesy night, at least our dinner was

I spent all day running around the house like a chicken with my head cut off. I re-organized all my kitchen cupboards and got my baking supplies all sorted out and in a logical manner.  No more running around trying to find everything the next time I get an urge to bake, yea!!  And with the exception of the clothes that we were wearing today, every piece of laundry has been done as well as some other cleaning. So I decided to make me a cheesy treat for dinner, and to make Johnny happy I included some breaded pork chops as well.

I love cheese, not the processed kind but real cheese.  I blame my mother for that one, and feel really bad that due to a dairy allergy that she can no longer enjoy the deliciousness of all that cheesy goodness.  Then I realize it just leaves more for me, sorry mother.

Homemade cheese potatoes and cauliflower with cheese sauce was my original plan for dinner, which is a good option for me but John likes to have meat with his sides so I threw some breaded pork chops onto the menu as an afterthought.

Today's ingredients were simple and staples around the house: skim milk, butter, flour, pepper, garlic powder, potatoes, cauliflower, pork chops and breadcrumbs.

First thing I did was get out the food processor to slice the potatoes for me because I was feeling a bit lazy from cleaning all day. Once they were all thinly sliced I tossed them into the casserole dish to await the cheese sauce.

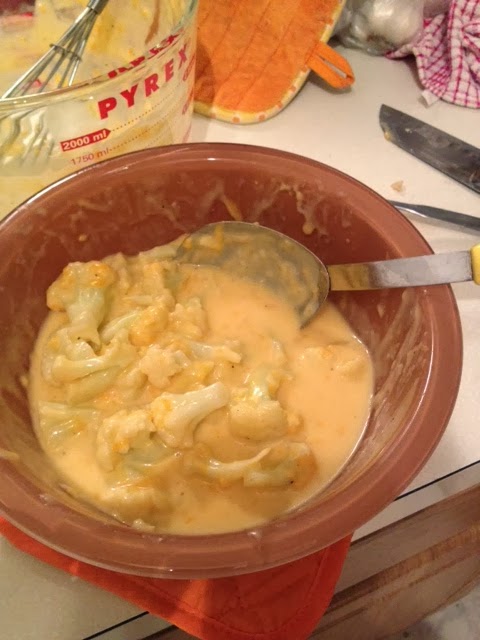
The cheese sauce was really easy to make and I made it in 2 batches, one for the potatoes then again for the cauliflower.  I use about 1 cup of milk for 2 potatoes (I like things really cheesy) so in a saucepan over low heat I added 4 cups of milk, about a teaspoon each of  pepper and garlic powder and 2 Tablespoons of butter and constantly stirring with a whisk brought it to a small rolling boil, removed it from the heat,  then added 4 teaspoons of flour (one at a time and made sure the previous was mixed in before adding the next). I have a giant Pyrex measuring cup that I had put 16 oz of shredded extra sharp cheese in and then added the milk mixture to that, stirring constantly with the whisk until it was blended.

Pour the mixture over the potato slices and mix it all in until it's all covered.

You can bake your pork chops separately or just toss the meat directly on the potatoes, which is what I do. It adds a little bit of extra flavor to the potatoes that I enjoy.

The pork chops are easy to bread and I haven't had any complaints yet about them. Just take a food storage bag, I use the twist tie ones, and put about a half cup of breadcrumbs in it. Rinse the meat under some cold water for a sec then toss it in the bag and shake it around until covered, then put the meat on your pan or in this case the potatoes, then keep repeating until all the pieces of meat are done.

Then the potatoes and meat go into the preheated oven at 350F for 40-60 minutes or until the meat is fully cooked (use a meat thermometer to check) and the potatoes are as well.

Let the potatoes sit for a few minutes before serving. This is the time that I make the cheese sauce for the cauliflower. Tonight it was the time that I noticed that I forgot to turn on the steamer so I had to pop the cauliflower in the microwave and after 5 min on the fresh veggie setting they were done.

For the cheese sauce for the cauliflower I used the same process to cook it but cut all the ingredients in half.

And for once I remembered to take some pictures before the food got devoured.

 
A Little Bit of Cauliflower, a whole lot of cheese sauce


MMMM, Cheesy potatoes


Not a lot of color in tonight's meal but it sure was tasty. 


Thanks for stopping by and reading this, feel free to comment. I'd love to hear from you.

Until next time,

Jessa

Tuesday, January 14, 2014

Mexican night, chicken burritos/soft shell tacos

Tonight turned out to be a Mexican night, when I asked John how he wanted the chicken for tonight's dinner cooked he said he was in a Mexican food mood. The easiest thing for me to make that he loves to eat is my chicken with rice and salsa.

Normally I just throw the uncooked chicken breasts into the crock pot with some salsa and let it cook all day, by then end of the day the chicken just falls apart and I shred it using a fork.  As I'm doing that I have some brown rice cooking in the rice cooker and when it's all done I mix it all together. I then set out the flour tortillas, the bowl of chicken and rice, some shredded cheddar cheese and sour cream and he goes to work making the perfect taco or burrito. Total time I'm actually working on it is around 10 minutes.

Today it was more of a last minute idea so I'm cooking the chicken and salsa on the stove. It ended up taking about 30 min to cook, stirring it every few minutes to keep it from burning on the bottom, until the point where the chicken was easy to shed with a fork. Added the rice to the mix before he could figure out it wasn't his preferred white rice and we were good to go.

Every time I make this and tell him it's what we are going to have, he's hesitant, thinking that he's not going to like it. Like clockwork, once it's time to assemble the burrito/taco he's giving me a kiss and telling me I should make it more because it's one of his favorites.

I disappointed myself tonight because I couldn't find any organic tortillas that didn't have any preservatives in them and didn't have enough time to try to make any from scratch, so I ended up buying the least offensive ones at the store. I did manage to find some yummy organic salsa though, and will use that until I get a chance to make my own homemade stuff which will hopefully be soon.

One of my plans for this week is to try out some homemade tortilla recipies which I will share once I find one (or more) that I like.

Until next time,

Jessa

Monday, January 13, 2014

Soups, a great meal for a cold day. Split Pea and 16 Bean soups from scratch

John has taken over my kitchen to make us dinner tonight, so I though I'd catch up on some things that I've made earlier this year and haven't posted.  Actually I've been banished from the kitchen until he's done for making some comments on his recent grocery purchases.  I looked on in horror as he pulled out sugar free pickles (have I mentioned I'm not a fan at all of fake sugars?), a package of spinach dip, crackers with half of the ingredients being preservatives, and the list goes on.  The only things I couldn't cringe at him getting were the fresh meats, fruits and veggies.  I remember now why I try to always go with him when he goes shopping, it's easier to just say no and put it back on the shelf while we are still in the store.  He is making an attempt though so I'll cut him a little slack seeing how before me he used to almost always eat out and mainly at fast food restaurants.

Well back to the soups. My mother, the kind and loving woman that she is, gave me a frozen ham bone with a lot of meat on it that she threw in the freezer after Christmas.  As soon as John heard about that he was asking me if I could make him some split pea soup.  I love soups and have been known to buy a ham just so I can cook with the bone. Of course, my answer was a resounding yes.  So I went to the store to buy the split peas and ended up with a pack of 16 bean soup as well.  Why make one soup when you can make two, right?

I cut the majority of the meat off of the bone then threw the bone into my crock pot along with the bag of split peas, a chopped onion and 7 cups of water and turned the crock pot on high, then ignored it for about 8 hours.

I pulled the ham bone out of the crock pot and strained all the peas and onion out of the water and threw them into my blender. Because of the amount I had to blend I took 1/3 of the peas and some of the broth and threw it into the blender and repeated the process. It was a bit thick for my taste at that point so I added a bit more broth until it had my desired thickness. Then I attacked the ham bone, pulling off chunks of meat and chopping them up and tossing them into the crock pot with the pureed split peas. I kept it cooking for another hour on low heat until John came home from work and served him a big bowl along with some of the homemade bread I had made.

I opened the bag of the 16 bean soup later that night and placed the beans in a bowl of cold water and let them soak overnight.  The flavor packet of artificial ham flavoring promptly got thrown in the garbage. The bag recommended soaking the bean overnight or 6 hours but I let it go a bit longer than that.  Ok, I admit I let it soak not only overnight but the majority of the next day as well.

I pulled out my large pasta pot and tossed in the beans, 6 cups of water, the rest of the ham I had chopped up the night before and some spices. The spices I used were 1 teaspoon each of crushed red peppers,  thyme, rosemary, basil, oregano and freshly ground black pepper.  I put in on over medium heat and let it simmer for about an hour and a half.  During which time I made some more fresh bread, this time into bread bowls as per request from John.

He loved both soups but I think that the bean soup being served in a bread bowl was what prompted his response of it being the best he had. Once again, I got a kiss and oodles of compliments on dinner and the knowledge of him eating healthy. It was a win-win situation all around.  . I even managed to sneak off to the kitchen and put some away for lunch before he polished the rest off.

Until next time,

Jessa

Sunday, January 12, 2014

Homemade meatloaf and mashed potatoes

I have several comfort foods and meatloaf is one of them. I like to go to the market and buy meat in bulk then prep it for easier mealtimes in the future. My meatloaf is one of those things. Because some stores add artificial food coloring to their meats to make them look more appealing to people I asked my local market if they added any to theirs, it got me a strange look from the butcher but he said that they didn't. I guess I was the first person to actually ask that question. I then happily placed my order for 10 lbs of the ground sirloin and about 30 lbs of other meats then went home to spend the next hour prepping it all for later use. The chicken and pork get the remaining fat trimmed off and put into separate 1 lb bags (some whole breasts some cut into strips), and the ground sirloin gets formed into some patty's for hamburgers, cooked up with onions and spices for recipes that call for ground beef (then put into 1 lb bags) and the rest get turned into meatloaf. Just chop up some onions and green peppers, add some breadcrumbs (toast the leftover bread into the oven then crumble into homemade breadcrumbs and add some dried herbs to flavor) and egg then mix until well blended. I then pop it into the pans I cook it in and pop in in the freezer for about 30 min then transfer it to a freezer bag. It then goes into the freezer until I get a craving for some meatloaf and just about all my work is done.


Most of the time I'm a bit lazy so I don't actually defrost the meatloaf before popping it in the oven. Instead I transfer it into the pan, add some diced tomatoes* on top then pop it in the oven (which I preheated to 350F) and let it cook for about 3 hours, or until the internal temp reaches 170 with my meat thermometer.

When I have the feeling it's got about 30 min left to cook I start on my potatoes. I bounce between redskin potatoes and Idaho, and leave the skins on if I'm using the redskin ones. Other that that it's pretty easy prep work for them, just dice them up into fairly small and uniform pieces and toss them into a pot of water and boil until cooked.  I normally drain them then put them back into the pot and grab some butter and one of my 3 potato mashers and start mashing away until they are creamy. It's a really good form of stress relief, as I found out one Thanksgiving years ago. Last time though John convinced me to try using my new mixer to do it.  Normally I'm not a huge fan of that seeing how they end up tough and kind of rubbery but they turned out wonderful.  Guess the trick is only having butter and the potatoes in there, if you add milk that's when they turn out like rubber.

Take the cooked meatloaf out of the oven, let set for a minute then serve with the potatoes and wait for the compliments to roll in, lol.


* I haven't had an opportunity to make my own stewed diced tomatoes so until I get around to it I've been using Hunt's no salt added diced tomatoes. They don't use any chemical or preservatives and even the no salt added ones taste great, especially if you are trying to limit your sodium intake.  If I fail to mention that fact to John he doesn't even notice when I end up not using any salt in my meals.

I decided to be nice to John and made him some gravy to go along with his potatoes using the juice from the meatloaf pan. It was mostly tomato juice but had little chunks of the tomatoes, peppers and bits of meat in it as well.  Heated it up in a saucepan and added flour in a teaspoon at a time, whisking it so it wouldn't clump until I reached the desired consistency.

I made the rolls using my homemade bread recipe and just rolled them into little balls and put them in a small baking dish with a little bit of garlic and parsley sprinkled on the top. Based on his eating most of the pan I have a feeling that I'm going to be making them more often.

Hope you enjoy this as much as we did,

Jessa

Homemade Chicken Pot Pie

Johnny loves chicken pot pie, and I'm a fan of it as well.  The last time I made it I didn't have a creamy sauce for it so that was his request for this time. If you have a dairy allergy you can just substitute ghee for the butter. Once again everything for tonight's dinner was made from scratch, and was easy enough to do even with the migraine headache I had.

I didn't have any pre-made chicken broth so I made my own while I cooked the chicken. Just threw the 2 lbs of chicken into a pot with a bunch of water (approx 6-7 cups) and added some diced onions and carrots, a head of garlic that I smashed, and some herbs that I bought fresh then dried myself (oregano, basil, thyme, and rosemary) and threw in a pinch of crushed red peppers and 2 medium bay leaves as well.

While that's boiling and cooking the chicken it's a great time to start making the crust.  Sometimes the old ways are the best so I went with the 3-2-1 approach to pie crusts. The 3-2-1 process is 3 parts flour, 2 parts shortening and 1 part water, it's a time honored way of making it that I don't find that needs to be changed.  Take out the food processor and put in 1 1/2 cups of flour, a cup of chilled shortening (Crisco or butter both work great, or even a combination of the 2) and a 1/2 cup of water.  I start off with just the flour and cubes of shortening and pulse it for a few seconds then start slowly adding the water.  You can tell it's done when it's looking like little grains of salt. Then you just transfer it to your pre-floured mat (or parchment paper) and roll it out with a rolling pin until you get a thin crust. I made 3 large crusts with mine. One went into the dish I was using for Johnny's (he likes top and bottom crusts while I prefer just to have one on top) and that and the other 2 crusts went into the refrigerator until I was ready for them again.

When the chicken was fully cooked I took my strainer and separated the chicken and cooked veggies from the broth which I put aside to use in a few minutes.  The chicken went to the cutting board and the veggies went to a bowl for when the sauce was done.  Once the chicken was all cut up I remembered that I had to grab the bay leaves out and once that treasure hunt was done, I transferred the chicken to the veggies and went to start on my sauce.

I used unsalted butter but for this step you can substitute ghee as well.  Just melt 1 stick into a sauce pan (I used the pot I had cooked the chicken in) and then added 3/4 c of flour until it was a paste, adding 1/4 c of the flour at first then sprinkling in a bit more as I stirred it to make sure it was mixed well.  Then I added 3 cups of the broth and stirred it into the paste over a low heat until it was a nice and creamy sauce.  Then came the fun part of adding in the chicken and veggies I had cooked earlier. I also added another chopped carrot (about 1 cup), some peas (another cup) and 2 cooked diced potatoes. (I like to dice up a couple redskin potatoes and cook them in the microwave which only takes a couple minutes) Just stir it all up together in the sauce and you're ready to take the pie crust out of the fridge and all the sauce.

After you put the top crust on the pies, don't forget to cut small vents in the top. I like to do small slashes around the edges to resemble sun rays and then make a smiley face in the middle. I think it's cute and kids and Johnny both smile when they see it.

Pop them into your preheated oven @ 350F and bake for 30-45 minutes, and your crust is a nice golden brown color.  It's really hot when it comes out of the oven so I'd recommend waiting 5-10 minutes before you serve it. Johnny's impatient when it comes to my cooking so he ended up burning his mouth on a bite, but he claims that it was worth it.

Another dinner that was healthy but my picky eater loved anyways. Don't think I'll get tired anytime soon of him telling me how delicious my cooking is.

Hoping that I can get pictures of the finished product before it disappears next time for y'all as well.

Until next time,

Jessa

Saturday, January 11, 2014

Making bread from scratch

I will fully admit that I'm a carbohydrate addict. I love bread, pasta and potatoes. In my quest to cut out processed foods I realized that I was going to need to find a recipe for bread that not only was fairly simple to make but tastes good as well.

My first attempt was well received by John and his mum but didn't meet up to my standards of a good bread, so it was back to the drawing board.

My latest attempt was up to my standards, and I used my new Kitchen Aid mixer so it was extremely easy as well. It doesn't contain any eggs or dairy so I could share the recipe with my mum so she could enjoy it as well.

The ingredients are pretty simple and basic and I just use my kitchen aid mixer and the dough hook to do all the work.

Ingredient List:

2 1/2 teaspoons active dry yeast (or 1 packet, if you buy them in those)
1 1/4 cups warm water (105-115 F, if the water is too hot it will kill the yeast so just use a meat thermometer to check the temp first)
3 cups all-purpose or bread flour (I use an ultra-grain all-purpose flour and it turns out great)
2 teaspoons sugar
1 teaspoon salt (I don't care for salty things so I cut it down to about 1/3- 1/2 teaspoon)
1 Tablespoon olive oil (plus extra to oil the bowl


Directions:
Add the yeast, water, 1 cup of flour and 1 teaspoon of the sugar into the mixer and blend it until it is all mixed. Turn off the mixer and let it sit for 10 minutes (when you come back the yeast will be bubbly)

Add the remaining flour, sugar and salt and mix it until all the flour is mixed in, this takes a few minutes. When all the flour is mixed in add the 1T of olive oil and let it mix for about 10 min or until the dough is all smooth.

Transfer the dough to a bowl that you oiled, don't be afraid to use more than a light oiling on the bowl, then roll the dough around in the excess oil then cover with a wet tea towel and place it in a warm spot for about an hour (or more) until the dough has doubled in size.

After that hour has passed and it's double it's original size, punch it down then roll it into it's desired shape and put the wet tea towel on it again until it is once again doubled in size.

Preheat your oven to 425F but when you go to put in the bread, turn the temp down to 400F.  It normally takes about 20-30 minutes for the bread to bake.  Don't put the bread on the top rack of the oven because it tends to burn the crust. You can tell the bread is done when you thump the bottom and it makes a hollow sound.


I decided to make a bread bowl with this bread for John and discovered the importance of putting a lot of oil into the bottom of the baking dish, I couldn't get it out of the casserole dish I used and had to serve his dinner in that along with some hot pads so he wouldn't burn himself.

Until next time,

Jessa

New Year and a new goal to eat more naturally

Happy 2014 everyone!!

My resolution for the new year was to try to eat more healthy and to get my picky man to do the same. Last year he ended up having open heart surgery and was instructed by his doctors to start eating better. This worked for a little while, until he realized that he was drinking skim milk and other healthy things. The foods he had been eating for the previous months suddenly became gross, just because he now knows that they are good for him. So while he would eat the dinners I made for him, it was hard to sneak in junk food when I'm sitting right next to him, I discovered that he was eating McDonald's and other fast foods when I wasn't around.

A recent visit to his doctor slightly changed his mind about the way he was eating, he had gained a bit of weight and his test results were not as good as they were when he was following the diet that I had put him on.  So a compromise was born. He's now allowed to eat ground beef instead of me always substituting ground turkey, but everything he eats will now be homemade instead of store bought, which has a ton of chemicals and preservatives in it.

This became a little easier for him to follow when I had him cut the NutraSweet he always used out of his diet. Instead of using one of those packets in his beverages I told him to just use natural sugar, either white or brown sugars or even honey. After two weeks he admitted to feeling a bit better than he had been. Then next battle was over his powdered coffee-mate, which once again he had to admit that by adding regular milk instead of the powered product that he noticed that he was once again not gaining as much weight as well as feeling a bit better.  At this point he had to concede that maybe I did have a point and would listen to me a bit more without arguing as much.

After sharing with my mother my idea of cutting out all of the processed foods in our diet she encouraged me to write a blog about it so she can check up on our progress even on days that we don't get to talk, and here we are.

I hope you enjoy reading this blog and feel free to share your stories and thoughts with me as I share my thoughts, and recipes with you.

Until next time,

Jessa